
To R
|
Introduction
To R |
> x <- 1:20
> y <- x**3
> plot(x,y)
A new window will pop up and R will do the plot in that window. Subsequent plots will overwrite the current plot in this window.
If you want to start with a line plot instead of a point plot, use the optional argument type="l" with plot():
> plot(x,y,type="l")
> plot(x,y)
> points(rev(x),y)
> lines(x,8000-y)
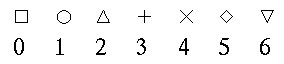
> plot(x,y)
> points(rev(x),y,pch=3)   add crosses
> points(x,8000-y,pch="$") use a dollar symbol
The first 7 numeric plot symbols look like this:
plot(x,y)
lines(x,y,lwd=4)        thick line
lines(rev(x),y,lty=2)   dashed line
> plot(c(0,20),c(-8000,8000),type='n')
> lines(x,y)
> lines(x,-y)
> plot(x,y,xlab="X Is Across",ylab="Y's Up")
> title("Titles are Tops")
> text(6,4000,"This goes anywhere")
> par(mfrow=c(2,3))  2x3 array
> plot(x,y)
> plot(x,2*y)
etc
The screen clears when you try and plot the seventh graph. To reset it back to normal, do par(mfrow=c(1,1)). The par() function can also do lots of other things. More later.
> hist(c(2,2,2,2,2,3,3,3,4,4,5,5))For some better examples I'll introduce you to the runif() function - this generates uniform random numbers between 0 and 1. Try this:
> x <- runif(100) 100 random numbers
> hist(x)
This shows a fairly uniform distribution of the 100 numbers. Now if we keep adding more numbers to each one, we should eventually approximate a Normal distribution. First set the graphics device to display 9 graphs at a time with par(mfrow=c(3,3)) and then repeat the following a few times:
> x <- x + runif(100)
> hist(x)
Eventually the graph should look like a Normal distribution.
> dev.print()
request id is hp1-16905 (standard input)
X11
2
The function returns a message indicating that the plot has been sent
to the default printing device (the laser printer in the Resources Room).
Rather than sending every plot to the printer you can instead store them into files. This is particularly useful for essays and reports since these files can be easily read into standard word processors (Latex, Word, etc). To generate a Postscript file (.ps) type:
> dev.print(file="filename.ps")
Alternatively, you can type:
> postscript(file='filename.ps', hor=F)
where the option hor=F tells R that you want to create a ps
file on a portrait orientation. To create a file on a landscape
orientation
set
hor=T.
Now you will have to re-run the command(s) for creating the plot(s).
For example:
> par(mfrow=c(2,1)) 2x1
array
> x <- runif(100)
> hist(x)
> x <- x + runif(100)
> hist(x)
> dev.off()
null device
1
The command dev.off() closes the ps file. You can take a look at the output file using ghostview.